开始
让我们从头开始。
JS是一门入门很简单的语言,能够给新手很强的自信心,这对学习是很大的帮助。就连写JS的工具都不需要特别复杂,你可以直接在记事本中输入如下部分并保存为index.html,然后在浏览器打开就是一个网页了。
1
2
3
4
5
6
7
8
9
10
11
12
13
14
15
16
17
18
19
20
| <!DOCTYPE html>
<html lang="en">
<head>
<title></title>
<meta charset="UTF-8">
<meta name="viewport" content="width=device-width, initial-scale=1">
<style>
.root {
width: 300px;
height: 300px;
}
</style>
</head>
<body>
<div class="root"></div>
<script>
document.querySelector('.root').style.background = 'red';
</script>
</body>
</html>
|
再进一步,就是找一个好用的文本编辑器,将HTML、JS、CSS分离,变得稍微专业一些。然后学习Vue、React、Angular等框架。这时已经可以正常进行项目开发了。
这些框架各自提供了自己的脚手架,让我们可以实时看到自己写的代码产生的效果,但是如果我平时学习,难道也要分开好几个文件夹吗?那太麻烦了,可不可以在一套工程配置里实现兼容几种框架并且全部可以热更新?
当然可以。
基础
推荐一篇文章https://www.jianshu.com/p/42e11515c10f,笔者入门也是看到这篇文章。写的很好。如果你只想跟着一个人系统的学,那么可以看这里,也很详细!
首先创建一个新的文件夹learnPack,进入文件夹,执行初始化
安装webpack,这里的版本是webpack4,每个大的版本之间是不能混用的
1
2
3
| npm install webpack -g
npm install webpack -D
npm install webpack-cli -D
|
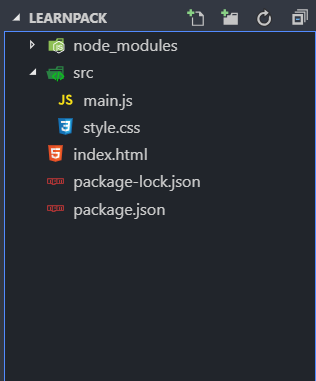
安装好后创建index.html、src/main.js、src/style.css:
1
2
3
4
5
6
7
8
9
10
11
12
13
14
15
|
<!DOCTYPE html>
<html lang="en">
<head>
<title>learn webpack</title>
<meta charset="UTF-8">
<meta name="viewport" content="width=device-width, initial-scale=1">
<link rel="stylesheet" href="./src/style.css">
</head>
<body>
<div class="root"></div>
<script src="./dist/main.js"></script>
</body>
</html>
|
1
2
3
4
5
|
function init() {
document.querySelector('.root').innerHTML = 'hello webpack';
}
init();
|
1
2
3
4
5
|
.root {
font-size: 100px;
color: aqua;
}
|
目录结构如下:
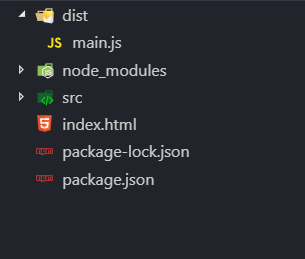
文件全部创建好后,开始打包!
看到这些就说明打包成功了!

在目录中也看到了多了个dist文件夹,里面有我们的main.js,打开可以看到里面是处于压缩状态的,而且之前我们已经在index.html中引入了dist/main.js文件,在浏览器打开即可看到“hello webpack!”
那么,如果我想将打包文件输出至”build”文件夹呢?而且名称改为bundle怎么做?
现在,我们先添加一个webpack的配置文件:
1
2
3
4
5
6
7
8
9
10
|
module.exports = {
entry: __dirname + "/src/main.js",
output: {
path: __dirname + "/build",
filename: "bundle.js"
}
}
|
有了这些配置,就可以在命令行直接执行webpack,webpack会自动识别这个文件里的配置
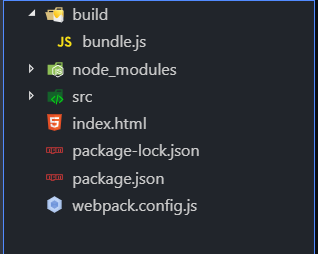
执行成功!
webpack中重要的几个概念是entry(入口)、output(输出)、loader(理解为解析器)、plugins(插件)。其中loader和plugins是可选的,我们这个简单的文件当然不需要。接下来搭建本地服务器,在线编辑并预览!
1
2
|
npm install webpack-dev-server -D
|
继续在webpack配置文件中添加服务配置devServer项:
1
2
3
4
5
6
7
8
9
10
11
12
13
14
15
16
17
18
19
20
21
22
23
24
25
|
console.log(__dirname);
module.exports = {
entry: __dirname + "/src/main.js",
output: {
path: __dirname + "/build",
filename: "bundle.js"
},
devServer: {
contentBase: './',
host: 'localhost',
port: '8080',
historyApiFallback: true,
inline: true,
clientLogLevel: 'none',
compress: true,
hot: true,
hotOnly: true,
noInfo: true,
index: 'index.html',
progress: true,
watchContentBase: false,
open: true
}
}
|
1
2
3
4
5
6
7
8
9
10
11
12
13
14
15
|
<!DOCTYPE html>
<html lang="en">
<head>
<title>learn webpack</title>
<meta charset="UTF-8">
<meta name="viewport" content="width=device-width, initial-scale=1">
<link rel="stylesheet" href="./src/style.css">
</head>
<body>
<div class="root"></div>
<script src="bundle.js"></script>
</body>
</html>
|
在package.json的scripts中添加start和buld指令:
1
2
3
4
5
6
7
8
9
10
11
12
13
14
15
16
17
18
19
| {
"name": "learnpack",
"version": "1.0.0",
"description": "",
"main": "main.js",
"scripts": {
"test": "echo \"Error: no test specified\" && exit 1",
"start": "webpack-dev-server",
"build": "webpack"
},
"author": "",
"license": "ISC",
"dependencies": {},
"devDependencies": {
"webpack": "^4.33.0",
"webpack-cli": "^3.3.4",
"webpack-dev-server": "^3.7.1"
}
}
|
运行npm start 就可以在浏览器端 http://localhost:8000 看到运行结果啦!
在清楚了基础操作后建议将官方网站浏览一遍
热更新配置
热更新(Hot Module Replacement)是 webpack-dev-server 最强大的功能之一。它能在不刷新整个页面的情况下,将修改的模块替换到运行中的页面里,保留应用的状态。比如你在表单填了一半、弹窗开到一半时改了样式代码,热更新可以只替换样式而保持表单状态不变。
启用 HMR
在 devServer 中已经设置 hot: true 了,但这还不够,还需要添加 webpack.HotModuleReplacementPlugin 插件:
1
2
3
4
5
6
7
8
9
10
11
12
13
14
15
16
17
18
19
20
21
22
23
|
const webpack = require('webpack');
module.exports = {
entry: __dirname + "/src/main.js",
output: {
path: __dirname + "/build",
filename: "bundle.js"
},
devServer: {
contentBase: './',
host: 'localhost',
port: '8080',
historyApiFallback: true,
inline: true,
hot: true,
hotOnly: true,
open: true
},
plugins: [
new webpack.HotModuleReplacementPlugin()
]
}
|
同时,在入口文件 main.js 中加入模块热替换的接口代码:
1
2
3
4
5
6
7
8
9
10
|
function init() {
document.querySelector('.root').innerHTML = 'hello webpack';
}
init();
if (module.hot) {
module.hot.accept();
}
|
到此为止,我们已经有了一套支持热更新的基础配置。接下来分别配置原生 JS、Vue 和 React 三种场景。
场景一:原生 JS + 多页面
如果你只是写写 demo、做做练习,不想每次都开一个脚手架,那用这套配置就够了。webpack 支持多入口,每个入口对应一个页面:
1
2
3
4
5
6
7
8
9
10
11
12
13
14
15
16
17
18
19
20
21
22
23
24
25
26
27
28
29
30
31
32
33
34
35
36
37
38
39
40
41
|
const webpack = require('webpack');
const HtmlWebpackPlugin = require('html-webpack-plugin');
module.exports = {
entry: {
index: __dirname + '/src/index.js',
demo: __dirname + '/src/demo.js'
},
output: {
path: __dirname + '/build',
filename: '[name].bundle.js'
},
module: {
rules: [
{
test: /\.css$/,
use: ['style-loader', 'css-loader']
}
]
},
devServer: {
contentBase: './',
hot: true,
open: true
},
plugins: [
new webpack.HotModuleReplacementPlugin(),
new HtmlWebpackPlugin({
template: './src/index.html',
filename: 'index.html',
chunks: ['index']
}),
new HtmlWebpackPlugin({
template: './src/demo.html',
filename: 'demo.html',
chunks: ['demo']
})
]
}
|
1
2
3
4
5
6
7
|
const div = document.createElement('div');
div.className = 'box';
div.textContent = 'Hello from index';
document.body.appendChild(div);
if (module.hot) module.hot.accept();
|
每个页面独立一个入口,互不干扰。修改样式或逻辑后,只会热更新对应模块,不会丢失页面状态。
场景二:Vue 单文件组件
Vue 推荐用单文件组件(.vue 文件)来组织代码。我们需要 vue-loader 和 vue-template-compiler。需要注意的是,这两个包的大版本必须匹配——vue-loader@15 搭配 vue-template-compiler@2.x。
1
| npm install vue vue-loader vue-template-compiler -D
|
1
2
3
4
5
6
7
8
9
10
11
12
13
14
15
16
17
18
19
20
21
22
23
24
25
26
27
28
29
30
31
32
33
34
35
36
37
38
39
40
41
42
43
44
45
46
47
|
const webpack = require('webpack');
const VueLoaderPlugin = require('vue-loader/lib/plugin');
const HtmlWebpackPlugin = require('html-webpack-plugin');
module.exports = {
entry: __dirname + '/src/main.js',
output: {
path: __dirname + '/build',
filename: 'bundle.js'
},
resolve: {
extensions: ['.js', '.vue'],
alias: {
'vue$': 'vue/dist/vue.esm.js'
}
},
module: {
rules: [
{
test: /\.vue$/,
loader: 'vue-loader'
},
{
test: /\.css$/,
use: ['style-loader', 'css-loader']
},
{
test: /\.js$/,
loader: 'babel-loader',
exclude: /node_modules/
}
]
},
devServer: {
hot: true,
open: true
},
plugins: [
new webpack.HotModuleReplacementPlugin(),
new VueLoaderPlugin(),
new HtmlWebpackPlugin({
template: './src/index.html'
})
]
}
|
1
2
3
4
5
6
7
8
9
10
11
12
13
14
15
16
17
18
| <!-- src/App.vue -->
<template>
<div class="app">
<h1>{{ msg }}</h1>
</div>
</template>
<script>
export default {
data() {
return { msg: 'Hello Vue + HMR' }
}
}
</script>
<style scoped>
.app { color: #42b983; }
</style>
|
1
2
3
4
5
6
7
8
9
10
11
|
import Vue from 'vue';
import App from './App.vue';
new Vue({
render: h => h(App)
}).$mount('#app');
if (module.hot) {
module.hot.accept();
}
|
Vue 的 HMR 在 vue-loader 中已经内置了——修改 .vue 文件的 <template> 时,只会替换模板不重置状态;修改 <style> 时,只换样式不重渲染;只有在修改 <script> 的 data 或逻辑时,才会重新执行组件实例。
场景三:React + react-hot-loader
React 的 HMR 需要额外的 react-hot-loader 配合。同时需要 Babel 来编译 JSX。
1
2
| npm install react react-dom react-hot-loader -D
npm install @babel/core @babel/preset-env @babel/preset-react babel-loader -D
|
1
2
3
4
5
6
7
8
9
10
11
12
13
14
15
16
17
18
19
20
21
22
23
24
25
26
27
28
29
30
31
32
33
34
35
36
37
38
39
40
41
42
43
|
const webpack = require('webpack');
const HtmlWebpackPlugin = require('html-webpack-plugin');
module.exports = {
entry: __dirname + '/src/index.js',
output: {
path: __dirname + '/build',
filename: 'bundle.js'
},
resolve: {
extensions: ['.js', '.jsx']
},
module: {
rules: [
{
test: /\.jsx?$/,
exclude: /node_modules/,
use: {
loader: 'babel-loader',
options: {
presets: ['@babel/preset-env', '@babel/preset-react'],
plugins: ['react-hot-loader/babel']
}
}
},
{
test: /\.css$/,
use: ['style-loader', 'css-loader']
}
]
},
devServer: {
hot: true,
open: true
},
plugins: [
new webpack.HotModuleReplacementPlugin(),
new HtmlWebpackPlugin({
template: './src/index.html'
})
]
}
|
1
2
3
4
5
6
7
8
9
10
11
12
13
14
15
16
17
18
19
20
21
|
import { hot } from 'react-hot-loader/root';
import React, { Component } from 'react';
class App extends Component {
state = { count: 0 };
render() {
return (
<div>
<p>Count: {this.state.count}</p>
<button onClick={() => this.setState(s => ({ count: s.count + 1 }))}>
+
</button>
</div>
);
}
}
export default hot(App);
|
1
2
3
4
5
6
7
8
9
10
|
import React from 'react';
import ReactDOM from 'react-dom';
import App from './App';
ReactDOM.render(<App />, document.getElementById('app'));
if (module.hot) {
module.hot.accept();
}
|
react-hot-loader 的 hot() 高阶组件是关键——它让组件在被替换时保留内部 state。你可以在页面上点了几次计数器的按钮,然后修改渲染逻辑,计数不会归零,这就是热更新的价值。
合一:如何在一个工程里同时兼容三套框架?
把上面的 loader 规则和插件合并到同一个 webpack.config.js 中即可。Vue 和 React 在同一个工程里互不冲突,唯一的代价是多装了一些依赖和首次构建稍慢一些。最终的目录结构如下:
1
2
3
4
5
6
7
8
9
10
11
12
| learnPack/
├── src/
│ ├── index.html # 原生 JS 页面
│ ├── index.js
│ ├── vue.html # Vue 页面
│ ├── vue.js
│ ├── App.vue
│ ├── react.html # React 页面
│ ├── react.js
│ └── App.js
├── package.json
└── webpack.config.js
|
1
2
3
4
5
6
7
8
9
10
11
12
13
14
15
16
17
18
19
20
21
22
23
24
25
26
27
28
29
30
31
32
33
34
35
36
37
38
39
40
41
42
43
44
45
46
47
48
49
50
51
52
53
54
55
56
57
58
59
60
61
62
63
64
65
66
67
68
69
|
const webpack = require('webpack');
const HtmlWebpackPlugin = require('html-webpack-plugin');
const VueLoaderPlugin = require('vue-loader/lib/plugin');
module.exports = {
entry: {
index: __dirname + '/src/index.js',
vue: __dirname + '/src/vue.js',
react: __dirname + '/src/react.js'
},
output: {
path: __dirname + '/build',
filename: '[name].bundle.js'
},
resolve: {
extensions: ['.js', '.jsx', '.vue'],
alias: {
'vue$': 'vue/dist/vue.esm.js'
}
},
module: {
rules: [
{
test: /\.vue$/,
loader: 'vue-loader'
},
{
test: /\.jsx?$/,
exclude: /node_modules/,
use: {
loader: 'babel-loader',
options: {
presets: ['@babel/preset-env', '@babel/preset-react'],
plugins: ['react-hot-loader/babel']
}
}
},
{
test: /\.css$/,
use: ['style-loader', 'css-loader']
}
]
},
devServer: {
hot: true,
open: true,
port: 8080
},
plugins: [
new webpack.HotModuleReplacementPlugin(),
new VueLoaderPlugin(),
new HtmlWebpackPlugin({
filename: 'index.html',
template: './src/index.html',
chunks: ['index']
}),
new HtmlWebpackPlugin({
filename: 'vue.html',
template: './src/vue.html',
chunks: ['vue']
}),
new HtmlWebpackPlugin({
filename: 'react.html',
template: './src/react.html',
chunks: ['react']
})
]
}
|
运行 npm start 后,访问 http://localhost:8080 看到原生 JS 页面,访问 http://localhost:8080/vue.html 看到 Vue 页面,访问 http://localhost:8080/react.html 看到 React 页面。三个框架共享同一套 webpack 配置,全部支持热更新。
这个方案适合学习阶段用来对比不同框架的写法差异,也适合写技术 demo 分享。但生产项目还是推荐用框架各自的脚手架——它们经过更多实践检验,配置也更专业。