win7下拖动一个状态栏,可以看到整个对话框的边框变成了玻璃,待拖动到指定位置后松手,对话框就过去了
我们在网页中实现一下:
要点有两个:
如何实现
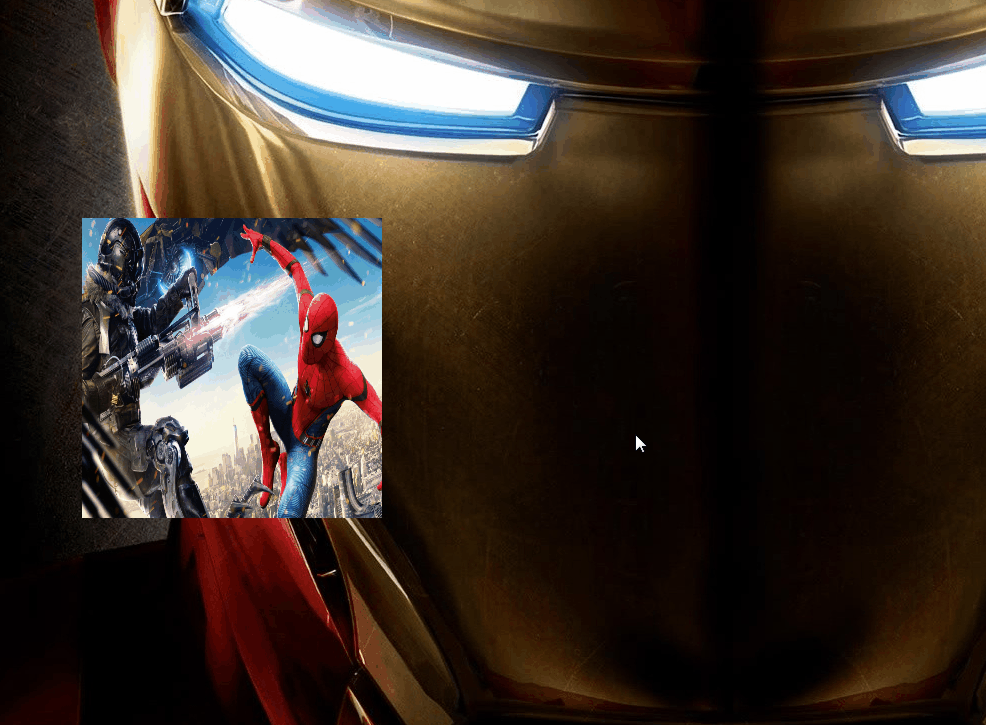
首先创建index.html,假设桌面背景为类名是glass的DIV,我们的对话框叫dialog,里面放个图片做区分。因为移动时要有一个透明玻璃边框,所以我们用replace来当边框
1
2
3
4
5
6
7
8
9
10
11
12
13
14
15
16
17
|
<!DOCTYPE html>
<html lang="en">
<head>
<title>glass</title>
<meta charset="UTF-8">
<meta name="viewport" content="width=device-width, initial-scale=1">
</head>
<body>
<div class="glass">
<div class="dialog">
<img class="img" src="../../../assets/images/spider.jpg">
</div>
<div class="replace"></div>
</div>
</body>
</html>
|
移动一个DIV块很简单,获取替代dialog的replace的距离窗口左边缘和上边缘的距离,再获取鼠标点击的坐标,进而计算出dialog应该在的位置,移动过去就行了。代码如下:
1
2
3
4
5
6
7
8
9
10
11
12
13
14
15
16
17
18
19
20
21
22
23
24
25
26
27
28
29
30
31
32
33
34
35
36
37
38
39
40
41
42
43
44
45
46
47
48
49
50
51
| let finalLeft;
let finalHeight;
function drag() {
let center = document.querySelector('.replace');
center.onmousedown = client;
}
function client(eve) {
let _eve = eve || window.event;
let replace = document.querySelector('.replace');
let disX = _eve.clientX - replace.offsetLeft;
let disY = _eve.clientY - replace.offsetTop;
document.onmousemove = function (event) {
let _event = event || window.event;
move(_event, disX, disY);
};
document.onmouseup = function () {
stop();
document.onmousemove = null;
document.onmouseup = null;
};
}
function move(eve, posx, posy) {
let _eve = eve || window.event;
let replace = document.querySelector('.replace');
finalLeft = _eve.clientX - posx;
finalHeight = _eve.clientY - posy;
let diffWidth = document.documentElement.clientWidth - replace.offsetWidth || document.body.clientWidth - replace.offsetWidth;
let diffHeight = document.documentElement.clientHeight - replace.offsetHeight || document.body.clientWidth - replace.offsetWidth;
if (finalLeft <= 0) {
finalLeft = 0;
}
if (finalHeight <= 0) {
finalHeight = 0;
}
if (finalLeft >= diffWidth) {
finalLeft = diffWidth;
}
if (finalHeight >= diffHeight) {
finalHeight = diffHeight;
}
replace.style.left = finalLeft + 'px';
replace.style.top = finalHeight + 'px';
}
function stop() {
document.querySelector('.dialog').style.left = finalLeft + 'px';
document.querySelector('.dialog').style.top = finalHeight + 'px';
}
window.onload = drag;
|
移动对话框没问题,玻璃边框呢?主要靠mix-blend-mode这个CSS属性
1
2
3
4
5
6
7
8
9
10
11
12
13
14
15
16
17
18
19
20
21
22
23
24
25
26
27
28
29
30
31
32
33
34
35
36
37
38
| * {
margin: 0;
padding: 0;
}
html, body {
width: 100%;
height: 100%;
}
.glass {
width: 100%;
height: 100%;
background: url(../../../assets/images/ironman.jpg) no-repeat 100% 100%;
}
.img {
width: 100%;
height: 100%;
}
.replace, .dialog {
position: absolute;
top: 0px;
left: 0px;
width: 300px;
height: 300px;
user-select: none;
padding: 10px;
}
.replace::after {
content: '';
position: absolute;
left: 0;
top: 0;
width: 300px;
height: 300px;
}
.replace:active::after {
border: 10px solid #fff;
mix-blend-mode: difference;
}
|
知识点
- offsetHeight/offsetWidth, offsetTop/offsetLeft
- clientHeight/clientWidth
- scrollHeight/scrollWidth
- scrollTop/scrollLeft
- 获取鼠标的坐标
- 混合模式mix-blend-mode
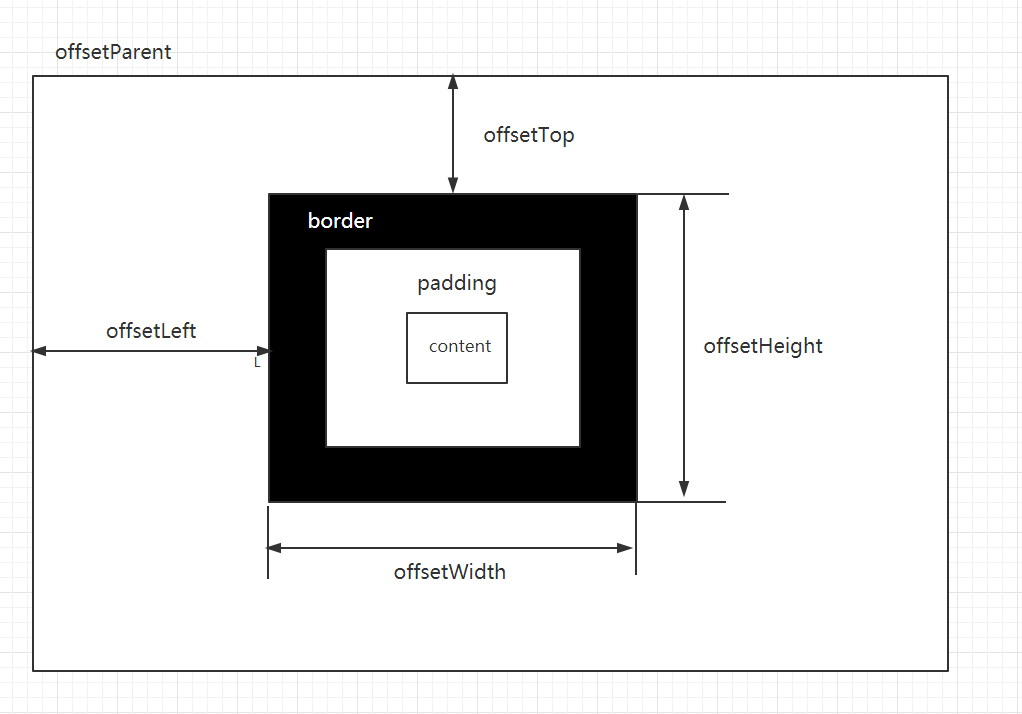
偏移量(offset dimension)
offsetHeight: 元素在垂直方向上占用的空间大小(px)。W3C标准盒模型都包含content、border和padding。但是IE盒模型设置width和height后,最终内容区域大小跟border和padding有关。
offsetWidth: 元素水平方向的空间大小(px)。
offsetHeight = height + border + padding,包括滚动条
offsetWidth = width + border + padding
offsetLeft: 返回当前元素外边框相对于其 offsetParent 元素的左内边框的距离(px)。
offsetTop: 返回当前元素外边框相对于其 offsetParent 元素的上内边框的距离(px)。
只读属性,offsetParent的选取方式:
1.距该元素最近的position不为static的祖先元素;
2.如果没有定位的元素,则 offsetParent 为最近的 table, table cell 或根元素。
这些值都是只读的,并且是number类型
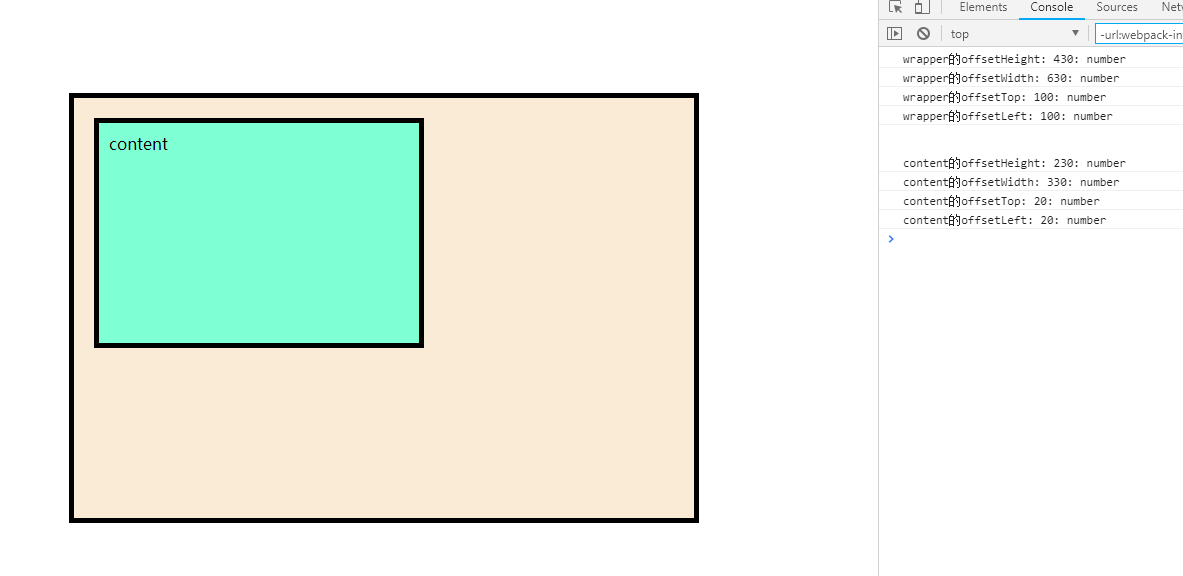
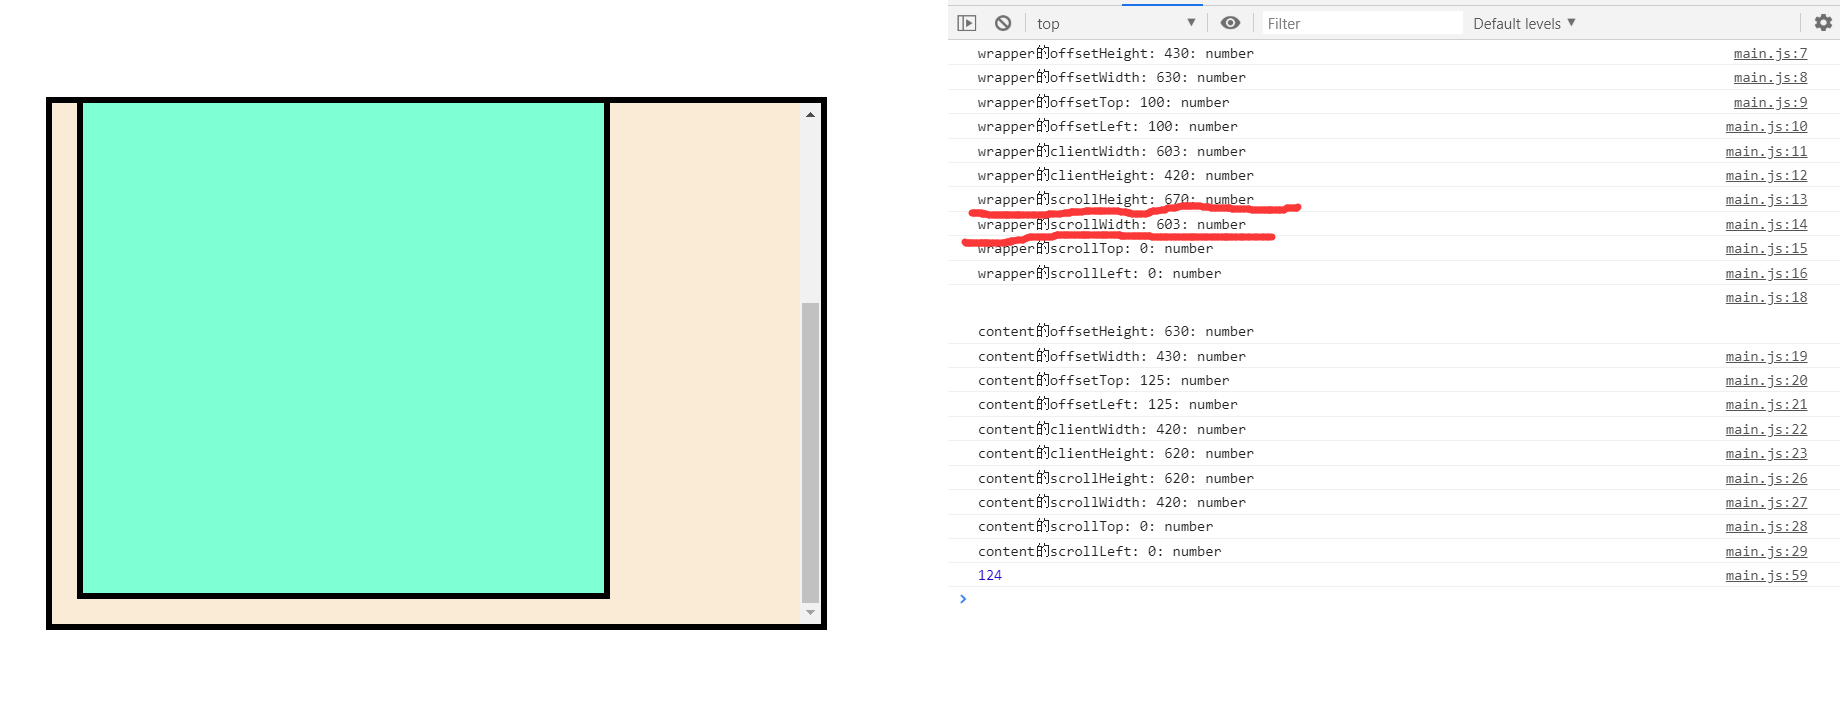
如下,content父元素有定位元素,则offsetTop返回content的上外边框(border外部)相对于wrapper的上内边框(border内部)距离,即content的marginTop+wrapper的paddingTop,是20px
wrapper父元素中没有定位元素,则offsetTop与offsetLeft返回相对于body的距离,即wrapper的marginTop和marginLeft
1
2
3
4
5
6
7
| <body>
<div class="wrapper">
<div class="content">
content
</div>
</div>
</body>
|
1
2
3
4
5
6
7
8
9
10
11
12
13
14
15
16
17
18
19
20
21
22
23
24
| * {
margin: 0;
height: 0;
}
.wrapper {
position: relative;
margin: 100px 100px 0;
padding: 10px;
width: 600px;
height: 400px;
border: 5px solid black;
overflow: auto;
background: antiquewhite;
}
.content {
margin: 10px;
padding: 10px;
width: 300px;
height: 200px;
border: 5px solid black;
background: aquamarine;
}
|
客户区大小(client dimension)
- clientWidth 元素的内容(content)和内边距(padding)占据的宽度。
- clientHeight 元素的内容(content)和内边距(padding)占据的高度。
- 这两个属性也受盒模型影响。
- scrollHeight 没有滚动条时的元素内容总高度(content + padding)
- scrollWidth 没有滚动条时的元素内容总宽度(content + padding)
- scrollTop 被隐藏在内容上侧的像素数
- scrollLeft 被隐藏在内容左侧的像素数
- scroll的空间占用的是父元素的空间,每个浏览器的默认宽度不同,chrome默认是17px宽
- 设置scrollscrollTop和scrollLeft可以改变滚动条的位置,但是要给内容的父元素设置,即滚动条所占空间的所有者。
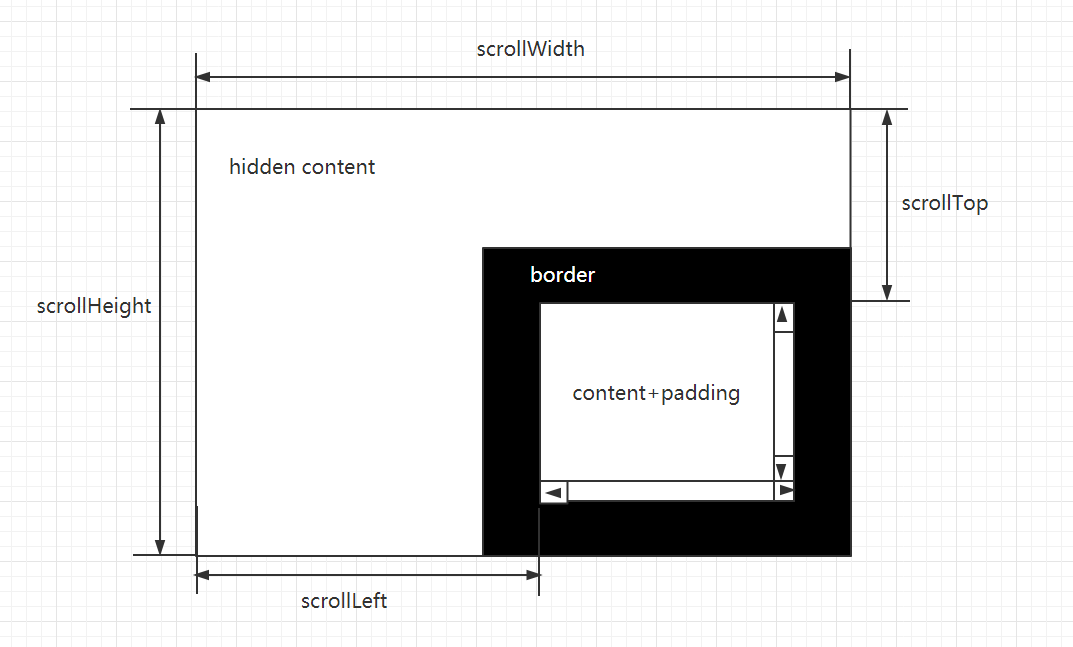
页面内没有任何可滑动元素时,根元素的scrollHeight = 根元素的高度,scrollWidth = 根元素的宽度
当页面内元素内部没有可滑动元素时,scrollHeight/scrollWidth = content + padding
1
2
3
4
5
6
7
8
9
10
11
12
13
14
15
16
17
18
19
20
21
22
23
24
25
26
27
| <!DOCTYPE html>
<html lang="en">
<head>
<meta charset="UTF-8">
<meta name="viewport" content="width=device-width, initial-scale=1.0">
<meta http-equiv="X-UA-Compatible" content="ie=edge">
<title>Document</title>
<style>
* {
margin: 0;
height: 0;
}
.wrapper {
margin: 100px 100px 0;
padding: 10px;
width: 600px;
height: 400px;
border: 5px solid black;
background: antiquewhite;
}
</style>
</head>
<body>
<div class="wrapper">
</div>
</body>
</html>
|
当页面内元素内部有可滑动元素时,scrollHeight = content + padding = 内部元素content的content + padding + border + margin + wrapper的padding = 670px
scrollWidth = content + padding = wrapper的padding + wrapper的width - 滚动条宽度17px(chrome默认宽度) = 603px
1
2
3
4
5
6
7
| <body>
<div class="wrapper">
<div class="content">
content
</div>
</div>
</body>
|
1
2
3
4
5
6
7
8
9
10
11
12
13
14
15
16
17
18
19
20
21
| * {
margin: 0;
height: 0;
}
.wrapper {
margin: 100px 100px 0;
padding: 10px;
width: 600px;
height: 400px;
border: 5px solid black;
overflow: auto;
background: antiquewhite;
}
.content {
margin: 10px;
padding: 10px;
width: 400px;
height: 600px;
border: 5px solid black;
background: aquamarine;
}
|
混合模式mix-blend-mode
| mode |
模式 |
Description |
| normal |
正常 |
直接返回结果色 |
| multiply |
正片叠底 |
查看每个通道中的颜色信息,并将基色与混合色复合 |
| screen |
滤色 |
与“正片叠底”相反,查看每个通道的颜色信息,将图像的基色与混合色结合起来产生比两种颜色都浅的第三种颜色 |
| overlay |
叠加 |
把图像的基色与混合色相混合产生一种中间色。 |
| darken |
变暗 |
查看每个通道中的颜色信息,并选择基色或混合色中较暗的颜色作为结果色 |
| lighten |
变亮 |
查看每个通道中的颜色信息,并选择基色或混合色中较亮的颜色作为结果色 |
| color-dodge |
颜色减淡 |
查看每个通道中的颜色信息,并通过减小对比度使基色变亮以反映混合色。与黑色混合则不发生变化 |
| color-burn |
颜色加深 |
查看每个通道中的颜色信息,并通过增加对比度使基色变暗以反映混合色,如果与白色混合的话将不会产生变化 |
| hard-light |
强光 |
产生一种强光照射的效果。如果混合色比基色更亮一些,那么结果色将更亮;如果混合色比基色更暗一些,那么结果色将更暗 |
| soft-light |
柔光 |
产生一种柔光照射的效果。如果混合色比基色更亮一些,那么结果色将更亮;如果混合色比基色更暗一些,那么结果色将更暗,使图像的亮度反差增大 |
| difference |
差值 |
查看每个通道中的颜色信息,从图像中基色的亮度值减去混合色的亮度值,如果结果为负,则取正值,产生反相效果 |
| exclusion |
排除 |
与“差值”模式相似,但是具有高对比度和低饱和度的特点。比用“差值”模式获得的颜色要柔和、更明亮一些 |
| hue |
色相 |
选择基色的亮度和饱和度值与混合色进行混合而创建的效果,混合后的亮度及饱和度取决于基色,但色相取决于混合色 |
| saturation |
饱和度 |
在保持基色色相和亮度值的前提下,只用混合色的饱和度值进行着色。基色与混合色的饱和度值不同时,才使用混合色进行着色处理。若饱和度为0,则与任何混合色叠加均无变化。当基色不变的情况下,混合色图像饱和度越低,结果色饱和度越低;混合色图像饱和度越高,结果色饱和度越高 |
| color |
颜色 |
引用基色的明度和混合色的色相与饱和度创建结果色。它能够使用混合色的饱和度和色相同时进行着色,这样可以保护图像的灰色色调,但结果色的颜色由混合色决定。颜色模式可以看作是饱和度模式和色相模式的综合效果,一般用于为图像添加单色效果 |
| luminosity |
亮度 |
能够使用混合色的亮度值进行着色,而保持基色的饱和度和色相数值不变。其实就是用基色中的“色相”和“饱和度”以及混合色的亮度创建结果色 |
| 分类名称 |
darken,multiply,color-burn |
介绍 |
| 降暗混合模式 |
亮度 |
减色,滤掉图像中高亮色,使图像变暗 |
| 加亮混合模式 |
screen,lighten,color-dodge |
加色模式,滤掉图像中暗色,使图像变亮 |
| 融合混合模式 |
overlay,soft-light,hard-light |
不同程度的图层融合 |
| 变异混合模式 |
difference,exclusion,hard-light |
用于制作各种变异的图层混合 |
| 色彩叠加混合模式 |
hue,saturation,color,luminosity |
根据图层的色相,饱和度等基本属性,完成图层融合 |
参考资料
《JavaScript高级程序设计》
《CSS混合模式mix-blend-mode/background-blend-mode简介》